• Home
  • About Me
    • Meet the Designer
      • Trixie Scraps Designs
      • Trixie Media
      • Trixie Loves Teachers
      • North Meets South Studios
    • Meet the Creative Team
      • Scrap Star Carrin
      • Scrap Star Jennifer
      • Scrap Star Mary Kate
      • Scrap Star Shauna
      • Scrap Star Shilo
      • Scrap Star Stacy
  • Store
    • Ginger Scraps Shop
    • Scrap Girls Shop
  • Blog
    • Learn – Masters Monday
    • Inspire – Wisdom Wednesday
    • Grow – Challenge Thursday
    • Reward – Free Downloads
  • Client Testimonials
  • Newsletter
  • Guest CT Application
  • Contact
    • Frequently Asked Questions – FAQ
    • Ask for Help
    • Teachers License Terms of Use
    • Privacy Policy

Trixie Scraps Designs

Great Designs. Your Memories. Perfect Together.

You are here: Home / Masters Monday / Converting a Picture to Black & White Without Losing Contrast

Posted On: May 4, 2010 · Written By: Erick

Converting a Picture to Black & White Without Losing Contrast

Welcome to another great Tips, Trends & Techniques Tuesday.

bw_wo_contrast.jpg 

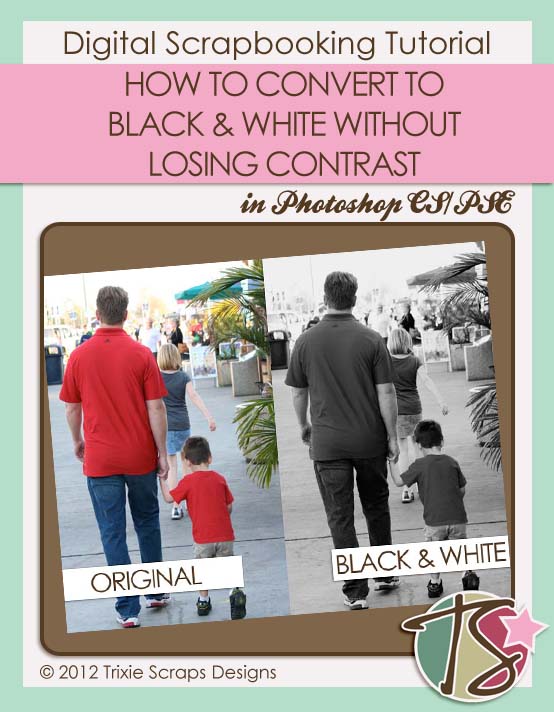
Have you ever had a picture that you wished was black & white? Maybe you have the perfect kit for your picture but the colors just don’t seem to work together. Or maybe you are looking for the elegant look that black & white pictures give.

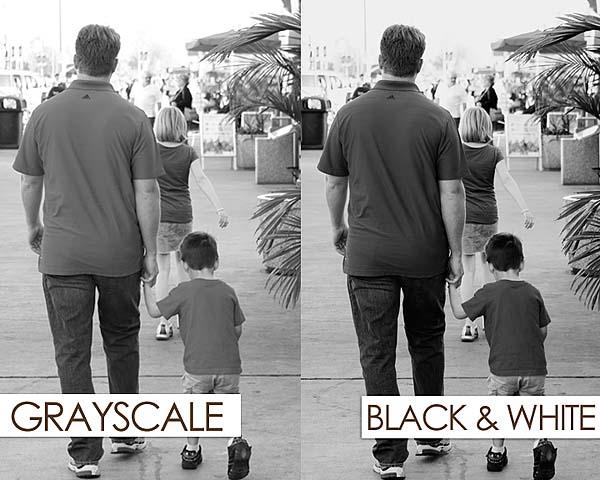
There are many ways that you can convert your color picture to black & white. One of the most common ways to convert it is to change the color mode to grayscale under the image menu. This tends to leave your picture fairly bland though.

See the difference?

grayscale_bw.jpg

Today I’m going to show you a way to convert your picture without losing the contrast and making you picture look flat. (The screenshots and directions are in Photoshop Elements 5.0.)

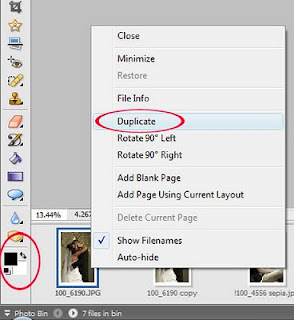
First open up the picture that you want to convert to black & white. To protect your original be sure to duplicate the picture by right clicking on the thumbnail in the Photo Bin and selecting Duplicate or select “Image > Duplicate.”

duplicate_palette.jpg 

Press D to set your foreground and background colors to the default black and white. Make sure that the black is in the top box. If it isn’t press X to switch them.

Now go to the top of the Layers Palette and choose Levels from the Adjustment Layers menu. When the box pops up don’t change anything on it right now, just click ok. This will add a layer to your Layers palette named Levels 1.

levels1.jpg

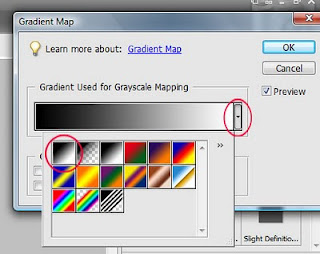
Go back to the Layers Adjustment menu and this time chose Gradient Map.

 gradientmap1.jpg

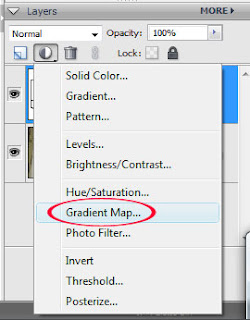
Check to make sure the gradient map is set on black to white. If it is not click on the arrow next to the gradient map and choose the correct gradient from the popup menu. Click ok. This will give you a layer in the Layers Palette named Gradient Map 1.

gradient-mat-select.jpg

Just going this far will already give you a better black & white picture, but we are not done yet.
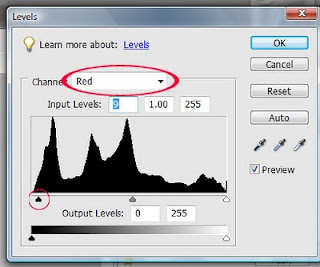
In the Layers palette, double-click on the Levels thumbnail in the Levels 1 layer. This will popup the Levels box. From here we are going to edit the individual colors, starting with red. So go ahead and choose the Red channel from the drop down menu. Grab the black (shadow) arrow under the Input Levels and slide it right. This will increase the shadows in the red channel.

red.jpg

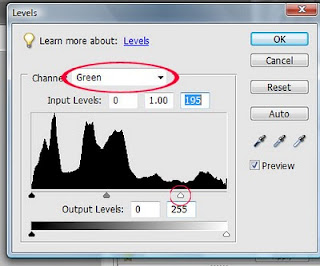
When you think you are satisfied with this edit, go back up to the drop down menu and choose the Green channel. On this one we are going to slide the white (highlights) arrow to the left.

green.jpg 
Again when you are satisfied with this edit, go back up to the drop down menu. This time we are going to work in the Blue channel. Go ahead and move the highlights arrow to the left quite a bit. Move the shadows arrow just a little bit to the right.

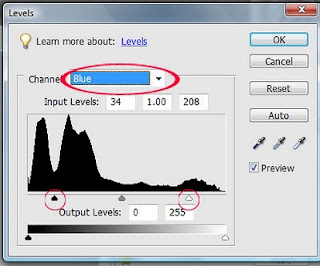
Not every picture you convert will have the same settings, play around with the sliders a bit until you get the effect you are looking for. When you are happy with how your picture looks go ahead and click OK.

blue.jpg

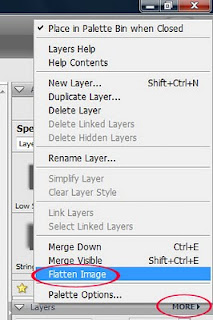
One last step and then we are done. Go to the Layers palette, click on More. From that menu choose Flatten Image. This will flatten the adjustment layers into your picture.

flatten.jpg

Check out the pictures side by side. The one on the left I just used the grayscale mode to convert the picture. Look how much of a difference there is in the one on the right.

grayscale_bw.jpg

Download Expired.
«
»

Filed Under: Masters Monday Tagged With: Daily Download

Comments

  1. ovaltine says

    May 4, 2010 at 4:08 am

    Thank you for your tutorial & gift!

  2. Stacey says

    May 4, 2010 at 6:04 am

    Thanks again 🙂

  3. Sharon Kay says

    May 4, 2010 at 7:30 am

    Thank you for the tutorial and the DDL!

  4. CBH says

    May 4, 2010 at 10:23 am

    Thank you so much for this post. I want to let you know that I posted a link to your blog in CBH Digital Scrapbooking Freebies, under the Page 7 post on May. 04, 2010. Thanks again.

  5. kline says

    May 4, 2010 at 10:23 am

    Very helpful tutorial…very clearly written and illustrated! Thank you very much for it and today’s download.

  6. CraftCrave says

    May 4, 2010 at 4:12 pm

    Just a quick note to let you know that a link to this post will be placed on CraftCrave in the DigiFree category today [04 May 03:00pm GMT]. Thanks, Maria

  7. Shanell says

    May 4, 2010 at 8:43 pm

    This DD is so fun! I am loving the colors and opening the folder every day is so much fun!

    Great tip today too! I love B&W!

  8. Anna says

    May 5, 2010 at 8:04 am

    Thanks a lot for the black and white tutorial…really helpful

  9. Rebecca says

    May 8, 2010 at 7:51 am

    Thank you! And great tutorial!!

  10. Dannethia says

    May 12, 2010 at 5:26 pm

    thank you

  11. SONDRA says

    May 17, 2010 at 8:03 am

    Thanks for a great TUT! Thanks for sharing the DD!

  • Facebook
  • Instagram
  • Pinterest
  • RSS
  • Twitter
  • YouTube

Stay in Touch!

Subscribe to my monthly newsletter to get updates on all my latest product releases, sales and free goodies, too! I've also provided options below for blog feed subscriptions, on either a daily or weekly basis. Don't miss a second of our awesome content!

Recent Posts

  • iNSD 2022 – Happy interNational Scrapbooking Day!
  • May 2022 Buffet Sale – You Say
  • April 2022 Buffet Sale – A Happy Song
  • April Fools Day Sale – Everything is 60% off!
  • March 2022 Daily Download Freebie Kit & Sale!
Guest Scrap Star Application

Archives

Categories

  • $2 Tuesday
  • Back from the Vault
  • Buffet Sale
  • Challenge Thursday
  • Digital Scrapbooking Freebies
  • Feature Friday
  • Fonts We Love Friday
  • Masters Monday
  • Merry Memories
  • Monthly Bake Sale
  • Monthly Desktop Freebies
  • News & Announcements
  • North Meets South Studios
  • Saturday with the Stars
  • Scrap Saturday
  • Sentiment Sunday
  • Special Request Sunday
  • Sunday Showoffs
  • Uncategorized
  • Wisdom Wednesday

Meta

  • Log in
  • Entries feed
  • Comments feed
  • WordPress.org

Helpful Links

  • Read My Blog
  • Visit My Shop
  • View Your Cart
  • Contact Me

Latest Freebies From My Blog

march 2022 daily download
dsd 2021

ABOUT TRIXIE SCRAPS... I'm Tracy, aka Trixie and owner/designer of Trixie Scraps Designs. I'm a 30-ish mama to 2 fur-babies, Lucy and Diamond. Creative to my core and married to shutterbug/big idea man/best guy ever, Erick. We currently live in a Kansas City suburb... but those who know me best know I'll always be a Jersey girl at heart. I'm a homebody and entrepreneur by nature Read More…

My Memories Suite Software Discount

MyMemories Suite Software Discount

Return to top of page · Copyright © 2025 Trixie Scraps Designs Great Designs. Your Memories. Perfect Together. · This site runs on Genesis for WordPress · Log in

Loading...

Insert/edit link

Enter the destination URL

Or link to existing content

    No search term specified. Showing recent items. Search or use up and down arrow keys to select an item.