• Home
  • About Me
    • Meet the Designer
      • Trixie Scraps Designs
      • Trixie Media
      • Trixie Loves Teachers
      • North Meets South Studios
    • Meet the Creative Team
      • Scrap Star Carrin
      • Scrap Star Jennifer
      • Scrap Star Mary Kate
      • Scrap Star Shauna
      • Scrap Star Shilo
      • Scrap Star Stacy
  • Store
    • Ginger Scraps Shop
    • Scrap Girls Shop
  • Blog
    • Learn – Masters Monday
    • Inspire – Wisdom Wednesday
    • Grow – Challenge Thursday
    • Reward – Free Downloads
  • Client Testimonials
  • Newsletter
  • Guest CT Application
  • Contact
    • Frequently Asked Questions – FAQ
    • Ask for Help
    • Teachers License Terms of Use
    • Privacy Policy

Trixie Scraps Designs

Great Designs. Your Memories. Perfect Together.

You are here: Home / Masters Monday / A How To Guide On Bending Photos

Posted On: September 15, 2014 · Written By: Carrin

A How To Guide On Bending Photos

Good morning and welcome back to the Trixie Scraps Blog.  Today is our Masters Monday feature.

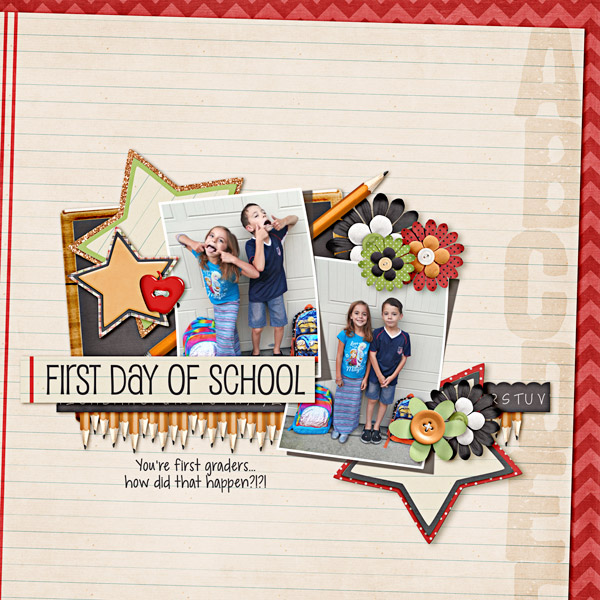
Last Thursday, I challenged you to create and share a layout with some Back to School photos.  On my sample layout, I bent the edges of my photos.  I wanted to show you exactly how I did that so you can replicate it if you’d like!  Ready?  Here we go!

Step 1: Open your photo(s). You are going to have to make your canvas slightly bigger so you have enough room to make the necessary changes around the edges of your photo.  Unlock your Background layer by double clicking on the padlock in the layers palette and then click on Image > Canvas Size.  Enlarge your dimensions slightly.  I found it was easier to choose Percent and just add on an extra 20%.  Make sure you check the “Relative” box so that your changes are equal all around.

Step 2: Put a stroke around your photo.  Go to Edit > Stroke and make your selections.  I did a 30 pixel stroke on the center of my photo, but you can change that to whatever you’d like.  It all depends on the look you want for your final photo.  (I forgot to take a screen shot of this…that’s what I get for trying to scrap while the kids are awake!)

Step 3: Now we’re ready to bend the photo.  Go to Filter > Distort > Shear.  Make sure Wrap Around is selected and drag the line in the middle of the box slight to the right or left (again, this depends on your own preferences).   Move your photo slightly over to the left so that you have room on your canvas for the next few steps.

Step 4: It’s time to create the shadow.  Hold down the Control key and select your photo layer.  Make a new layer out of the selection, fill it with a color (I used a dark brown, but you can use any shade of gray), and move it below your photo.

Step 5: Select your new shadow layer and go to Edit > Transform > Flip Horizontal.  Move the shadow layer slightly, so that the left edge is flush with side of the photo and you can see a bit of it peeking out underneath.

Step 6: Apply a Gaussian Blur to soften the shadow a bit.  Go to Fliter > Blur > Gaussian Blur.  I used a blur of 4 pixels.

Step 7: I then lowered the opacity of the shadow layer slightly, to about 75%.  Again, this depends on your own preference and the shadows you will be using on your page.

And here again is my layout, done using Apples for Teacher by Trixie Scraps.  I hope you are able to use the tutorial…make sure you upload your layout to the Trixie Scraps gallery so we can all take a look!  Happy Scrapping!

«
»

Filed Under: Masters Monday

  • Facebook
  • Instagram
  • Pinterest
  • RSS
  • Twitter
  • YouTube

Stay in Touch!

Subscribe to my monthly newsletter to get updates on all my latest product releases, sales and free goodies, too! I've also provided options below for blog feed subscriptions, on either a daily or weekly basis. Don't miss a second of our awesome content!

Recent Posts

  • iNSD 2022 – Happy interNational Scrapbooking Day!
  • May 2022 Buffet Sale – You Say
  • April 2022 Buffet Sale – A Happy Song
  • April Fools Day Sale – Everything is 60% off!
  • March 2022 Daily Download Freebie Kit & Sale!
Guest Scrap Star Application

Archives

Categories

  • $2 Tuesday
  • Back from the Vault
  • Buffet Sale
  • Challenge Thursday
  • Digital Scrapbooking Freebies
  • Feature Friday
  • Fonts We Love Friday
  • Masters Monday
  • Merry Memories
  • Monthly Bake Sale
  • Monthly Desktop Freebies
  • News & Announcements
  • North Meets South Studios
  • Saturday with the Stars
  • Scrap Saturday
  • Sentiment Sunday
  • Special Request Sunday
  • Sunday Showoffs
  • Uncategorized
  • Wisdom Wednesday

Meta

  • Log in
  • Entries feed
  • Comments feed
  • WordPress.org

Helpful Links

  • Read My Blog
  • Visit My Shop
  • View Your Cart
  • Contact Me

Latest Freebies From My Blog

march 2022 daily download
dsd 2021

ABOUT TRIXIE SCRAPS... I'm Tracy, aka Trixie and owner/designer of Trixie Scraps Designs. I'm a 30-ish mama to 2 fur-babies, Lucy and Diamond. Creative to my core and married to shutterbug/big idea man/best guy ever, Erick. We currently live in a Kansas City suburb... but those who know me best know I'll always be a Jersey girl at heart. I'm a homebody and entrepreneur by nature Read More…

My Memories Suite Software Discount

MyMemories Suite Software Discount

Return to top of page · Copyright © 2025 Trixie Scraps Designs Great Designs. Your Memories. Perfect Together. · This site runs on Genesis for WordPress · Log in

Loading...

Insert/edit link

Enter the destination URL

Or link to existing content

    No search term specified. Showing recent items. Search or use up and down arrow keys to select an item.