• Home
  • About Me
    • Meet the Designer
      • Trixie Scraps Designs
      • Trixie Media
      • Trixie Loves Teachers
      • North Meets South Studios
    • Meet the Creative Team
      • Scrap Star Carrin
      • Scrap Star Jennifer
      • Scrap Star Mary Kate
      • Scrap Star Shauna
      • Scrap Star Shilo
      • Scrap Star Stacy
  • Store
    • Ginger Scraps Shop
    • Scrap Girls Shop
  • Blog
    • Learn – Masters Monday
    • Inspire – Wisdom Wednesday
    • Grow – Challenge Thursday
    • Reward – Free Downloads
  • Client Testimonials
  • Newsletter
  • Guest CT Application
  • Contact
    • Frequently Asked Questions – FAQ
    • Ask for Help
    • Teachers License Terms of Use
    • Privacy Policy

Trixie Scraps Designs

Great Designs. Your Memories. Perfect Together.

You are here: Home / Masters Monday / Turning Fonts into 3D Titles

Posted On: April 15, 2013 · Written By: Scrap Stars

Turning Fonts into 3D Titles

Ever wondered how to?

Hey all you Trixie Scrappers! Have you? Ever wondered how some people create those neat titles on their layouts that look like puffy stickers? Well, let me (Jan) show you! It’s really not as hard as it looks.
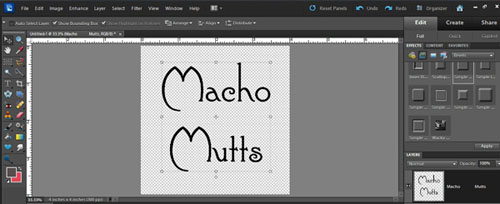
First, open a new file. Make it as big as you want, bigger is better. For this example I used 4 inches by 4 inches, but you can go as big as you want, because you can always crop it or scale it down when you’re done.
Next, type in your title using the font you chose; I suggest using the “bold” selection for more oomph. My font here is Connie, from this month’s Fun Font Friday post.

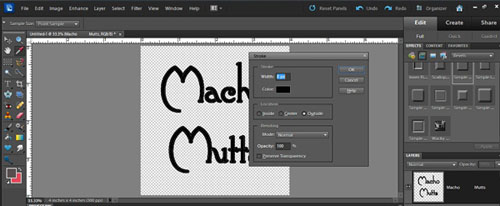
It still looks kind of puny, doesn’t it? How can we beef it up a bit without distorting it? By adding a stroke (Edit>stroke>) in the same colour you used to type, that’s how. first you’ll have to simplify your layer by right-clicking on it and selecting “Simplify layer”. I like to put the stroke outside the image in this kind of application for the slightly more interesting look I get but if you want really round, smooth edges, put your stoke inside.

That’s a good look, so on to the next step… another stroke, this time in white.

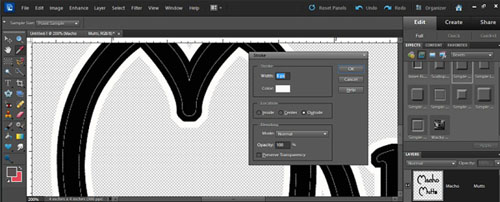
Now we’re getting somewhere! But it doesn’t really have much pizazz yet, so next I added a pink stroke but a narrower one. This time I went to 6 pixels instead of 8.

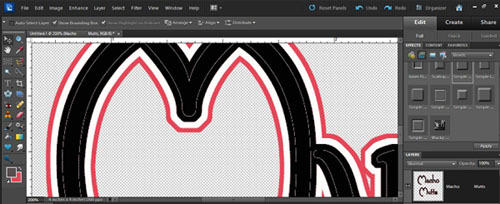
It’s still not quite right, so let’s add one more stroke, in white at 6 pixels wide.

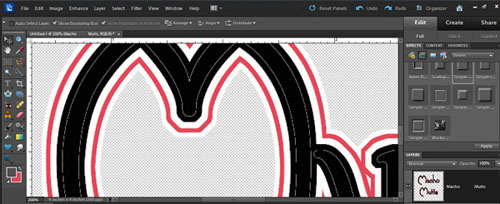
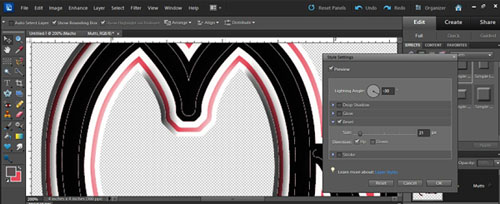
Yeah! That’s looking pretty good now! But it’s flat… Let’s puff it up a bit. This time we’re going to use the “simple emboss” bevel style in the effects palette. When you apply your bevel it’s not going to look very good at all, so double click on the “fx” symbol to the right of your layer. You can adjust the lighting angle and the height of your bevel using the sliders as shown. Play with the sliders until you like what you see. Zoom in so you can see exactly what happens.

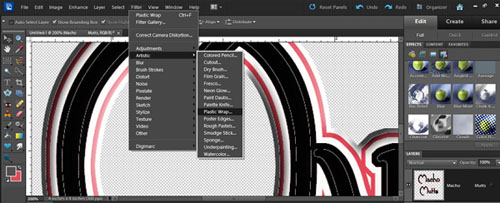
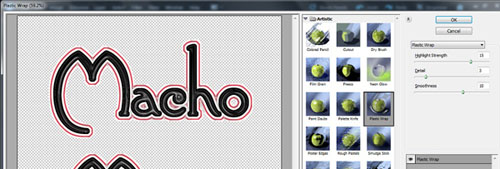
So now we’ve got a 3D image that looks so much more interesting than it did when we got started. But how did I make it so shiny? Easy peasy! Head up to your tool bar at the top of your screen and click on “filters”. From the drop-down menu, select “plastic wrap”.

Then you’ll see another adjustment screen as shown. Just play with the settings until you like how it looks.

And you’re done! (Trust me, once you’ve done it a few times, it gets a lot easier and takes a lot less time!) Now you can crop your image if you like, then drag-and-drop it onto your layout. Like any other layer you can scale it to fit where you want it to go, and it already has its own shadow, so that’s really all there it to it!
Okay. YOUR turn!! Show me what you can do!! Don’t forget to post a link here to your gallery so I can drop by and take a look.

All Trixie Scraps Designs products can be found in the following online stores:
Trixie Scraps Shop * My Memories * Gotta Pixel * Scrapbook Bytes

«
»

Filed Under: Masters Monday

Comments

  1. Liz says

    April 22, 2013 at 7:55 pm

    Thanks for the wonderful tutorial! I often make font titles and occasionally give them dimension, but I’m going to try giving as much as you showed us.

  • Facebook
  • Instagram
  • Pinterest
  • RSS
  • Twitter
  • YouTube

Stay in Touch!

Subscribe to my monthly newsletter to get updates on all my latest product releases, sales and free goodies, too! I've also provided options below for blog feed subscriptions, on either a daily or weekly basis. Don't miss a second of our awesome content!

Recent Posts

  • iNSD 2022 – Happy interNational Scrapbooking Day!
  • May 2022 Buffet Sale – You Say
  • April 2022 Buffet Sale – A Happy Song
  • April Fools Day Sale – Everything is 60% off!
  • March 2022 Daily Download Freebie Kit & Sale!
Guest Scrap Star Application

Archives

Categories

  • $2 Tuesday
  • Back from the Vault
  • Buffet Sale
  • Challenge Thursday
  • Digital Scrapbooking Freebies
  • Feature Friday
  • Fonts We Love Friday
  • Masters Monday
  • Merry Memories
  • Monthly Bake Sale
  • Monthly Desktop Freebies
  • News & Announcements
  • North Meets South Studios
  • Saturday with the Stars
  • Scrap Saturday
  • Sentiment Sunday
  • Special Request Sunday
  • Sunday Showoffs
  • Uncategorized
  • Wisdom Wednesday

Meta

  • Log in
  • Entries feed
  • Comments feed
  • WordPress.org

Helpful Links

  • Read My Blog
  • Visit My Shop
  • View Your Cart
  • Contact Me

Latest Freebies From My Blog

march 2022 daily download
dsd 2021

ABOUT TRIXIE SCRAPS... I'm Tracy, aka Trixie and owner/designer of Trixie Scraps Designs. I'm a 30-ish mama to 2 fur-babies, Lucy and Diamond. Creative to my core and married to shutterbug/big idea man/best guy ever, Erick. We currently live in a Kansas City suburb... but those who know me best know I'll always be a Jersey girl at heart. I'm a homebody and entrepreneur by nature Read More…

My Memories Suite Software Discount

MyMemories Suite Software Discount

Return to top of page · Copyright © 2025 Trixie Scraps Designs Great Designs. Your Memories. Perfect Together. · This site runs on Genesis for WordPress · Log in

Loading...

Insert/edit link

Enter the destination URL

Or link to existing content

    No search term specified. Showing recent items. Search or use up and down arrow keys to select an item.