• Home
  • About Me
    • Meet the Designer
      • Trixie Scraps Designs
      • Trixie Media
      • Trixie Loves Teachers
      • North Meets South Studios
    • Meet the Creative Team
      • Scrap Star Carrin
      • Scrap Star Jennifer
      • Scrap Star Mary Kate
      • Scrap Star Shauna
      • Scrap Star Shilo
      • Scrap Star Stacy
  • Store
    • Ginger Scraps Shop
    • Scrap Girls Shop
  • Blog
    • Learn – Masters Monday
    • Inspire – Wisdom Wednesday
    • Grow – Challenge Thursday
    • Reward – Free Downloads
  • Client Testimonials
  • Newsletter
  • Guest CT Application
  • Contact
    • Frequently Asked Questions – FAQ
    • Ask for Help
    • Teachers License Terms of Use
    • Privacy Policy

Trixie Scraps Designs

Great Designs. Your Memories. Perfect Together.

You are here: Home / Masters Monday / Masters Monday {How to Give Your Text a Letterpress Look}

Posted On: June 17, 2013 · Written By: Scrap Stars

Masters Monday {How to Give Your Text a Letterpress Look}

Hi-ho, Trixie Scrappers! Welcome to this week’s Masters Monday tutorial. Have you ever wondered how digiscrappers get that letterpress look on their journalling? I just had to find out so that I could share it with y’all. Who knew it would be so EASY?? I sure didn’t.

The technique works best on plain paper or cardstock, but I’m showing you that it works just fine on embossed card too. I love embossed cardstock so I had to find a way to make it look good. My trial-and-error tips will appear below.

Start off with your text box. You can use any font you want, but it looks best with typewriter, handwritten or sans serif fonts. You can also use any colour you want; I find that darker colours work best with embossed card… and I like to use a ballpoint blue shade for handwritten fonts.

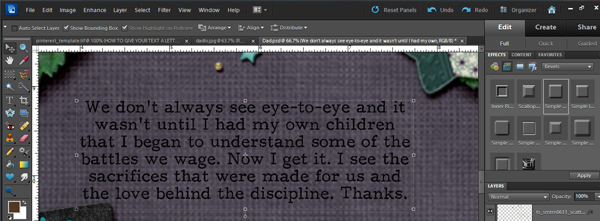
Keep your text box highlighted in your Layers palette. In your Effects palette, select Bevel>Simple Emboss>Apply. Your text will now look like this:

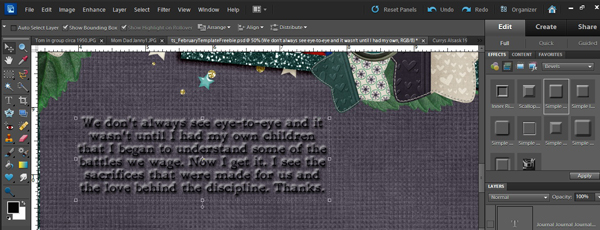
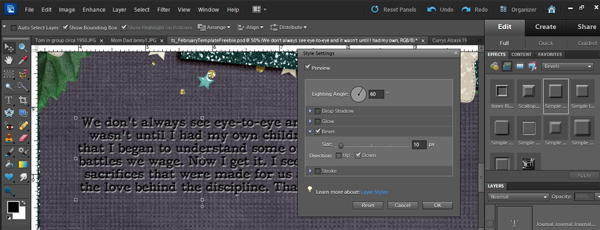
It’s sticking up from the surface of the paper, and that’s not a good look at all, so the next step is to double-click on the “fx” icon that is now showing in your text layer. You’ll get the Layers Style menu which will allow you to adjust your text’s appearance so that you get that lovely letterpress look. Decrease the size of your bevel by moving the slider to the left, to about 3-5 pixels if you’re using plain paper or smooth cardstock or to about 10 as I’ve done on my embossed card. You can also just type the number into the size box. At this point the text is still raised, so click the “Down” box et voila! Letterpress in three easy steps.

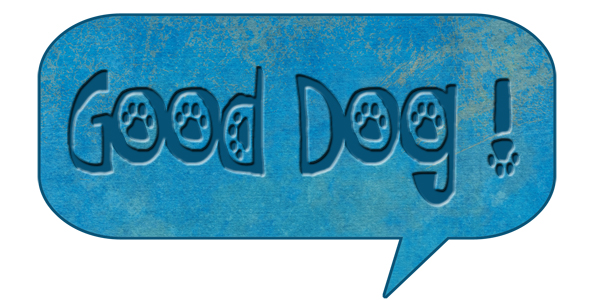
This nifty trick can be used with more detailed fonts too. You can really jazz up titles by using novelty fonts then letterpressing them like this:

Alrighty now… you’ve seen how easy-peasy this technique is, so I’m expecting to see LOTS of letterpress journalling in the Trixie Scraps gallery https://gallery.trixiescraps.com/. Off you go to rock it!

All Trixie Scraps Designs products can be found in the following online stores:
Trixie Scraps Shop * My Memories * Gotta Pixel * Scrapbook Bytes * Ginger Scraps

«
»

Filed Under: Masters Monday

  • Facebook
  • Instagram
  • Pinterest
  • RSS
  • Twitter
  • YouTube

Stay in Touch!

Subscribe to my monthly newsletter to get updates on all my latest product releases, sales and free goodies, too! I've also provided options below for blog feed subscriptions, on either a daily or weekly basis. Don't miss a second of our awesome content!

Recent Posts

  • iNSD 2022 – Happy interNational Scrapbooking Day!
  • May 2022 Buffet Sale – You Say
  • April 2022 Buffet Sale – A Happy Song
  • April Fools Day Sale – Everything is 60% off!
  • March 2022 Daily Download Freebie Kit & Sale!
Guest Scrap Star Application

Archives

Categories

  • $2 Tuesday
  • Back from the Vault
  • Buffet Sale
  • Challenge Thursday
  • Digital Scrapbooking Freebies
  • Feature Friday
  • Fonts We Love Friday
  • Masters Monday
  • Merry Memories
  • Monthly Bake Sale
  • Monthly Desktop Freebies
  • News & Announcements
  • North Meets South Studios
  • Saturday with the Stars
  • Scrap Saturday
  • Sentiment Sunday
  • Special Request Sunday
  • Sunday Showoffs
  • Uncategorized
  • Wisdom Wednesday

Meta

  • Log in
  • Entries feed
  • Comments feed
  • WordPress.org

Helpful Links

  • Read My Blog
  • Visit My Shop
  • View Your Cart
  • Contact Me

Latest Freebies From My Blog

march 2022 daily download
dsd 2021

ABOUT TRIXIE SCRAPS... I'm Tracy, aka Trixie and owner/designer of Trixie Scraps Designs. I'm a 30-ish mama to 2 fur-babies, Lucy and Diamond. Creative to my core and married to shutterbug/big idea man/best guy ever, Erick. We currently live in a Kansas City suburb... but those who know me best know I'll always be a Jersey girl at heart. I'm a homebody and entrepreneur by nature Read More…

My Memories Suite Software Discount

MyMemories Suite Software Discount

Return to top of page · Copyright © 2025 Trixie Scraps Designs Great Designs. Your Memories. Perfect Together. · This site runs on Genesis for WordPress · Log in

Loading...

Insert/edit link

Enter the destination URL

Or link to existing content

    No search term specified. Showing recent items. Search or use up and down arrow keys to select an item.